How to Set Up SFTP Server on Ubuntu 22.04

This guide will walk you through the complete process of setting up an SFTP server on Ubuntu 24.04. We will begin by updating your system and installing the necessary packages, followed by configuring the SSH server settings. Next, we’ll cover how to set up an SFTP user, configure permissions, and test the connection to ensure everything is working correctly. Follow the steps carefully to achieve a successful setup.

If a step-by-step guide isn’t your style, why not check out this video tutorial. In just a few minutes, you’ll see exactly how to set up your SFTP server with straightforward visuals – no fuss, just the info you need.

Step 1: System Update

To begin, update your system by executing the following command. This ensures that all your packages are up-to-date.

Step 2: Install OpenSSH Server

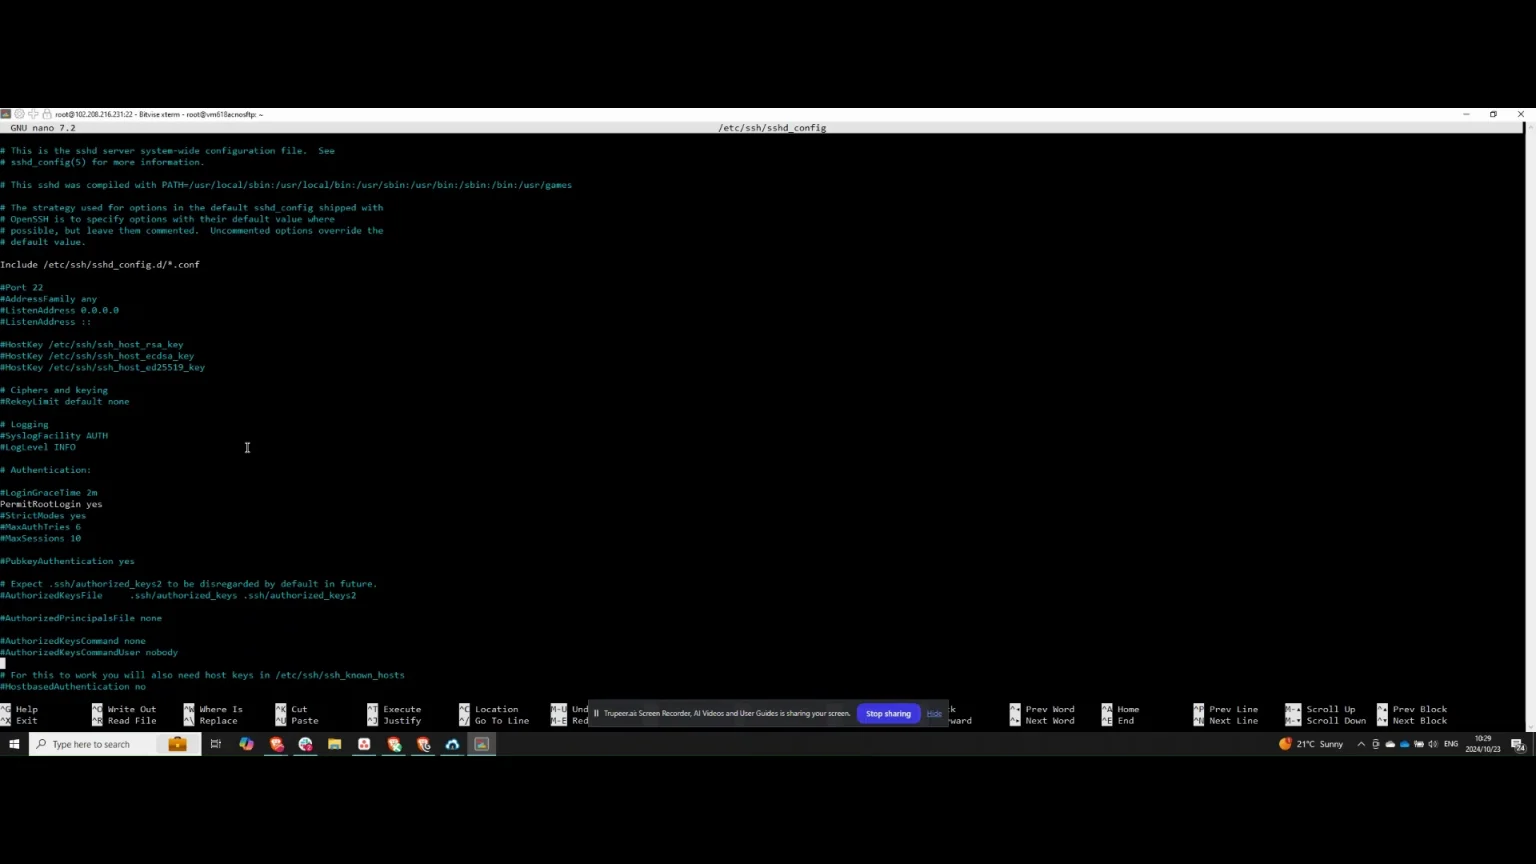
Next, install the OpenSSH server by running this command. If it is already installed, proceed to configure the SSHD configuration file. Within the file, locate the section for Subsystem sftp. If the section is missing, it will need to be added.

Step 3: Configure SSHD Settings

If the Subsystem sftp section is present, there is no need to add it. After confirming its presence, save and exit the configuration file. The next step involves creating a group named STPusers, which can be achieved by running the following command.

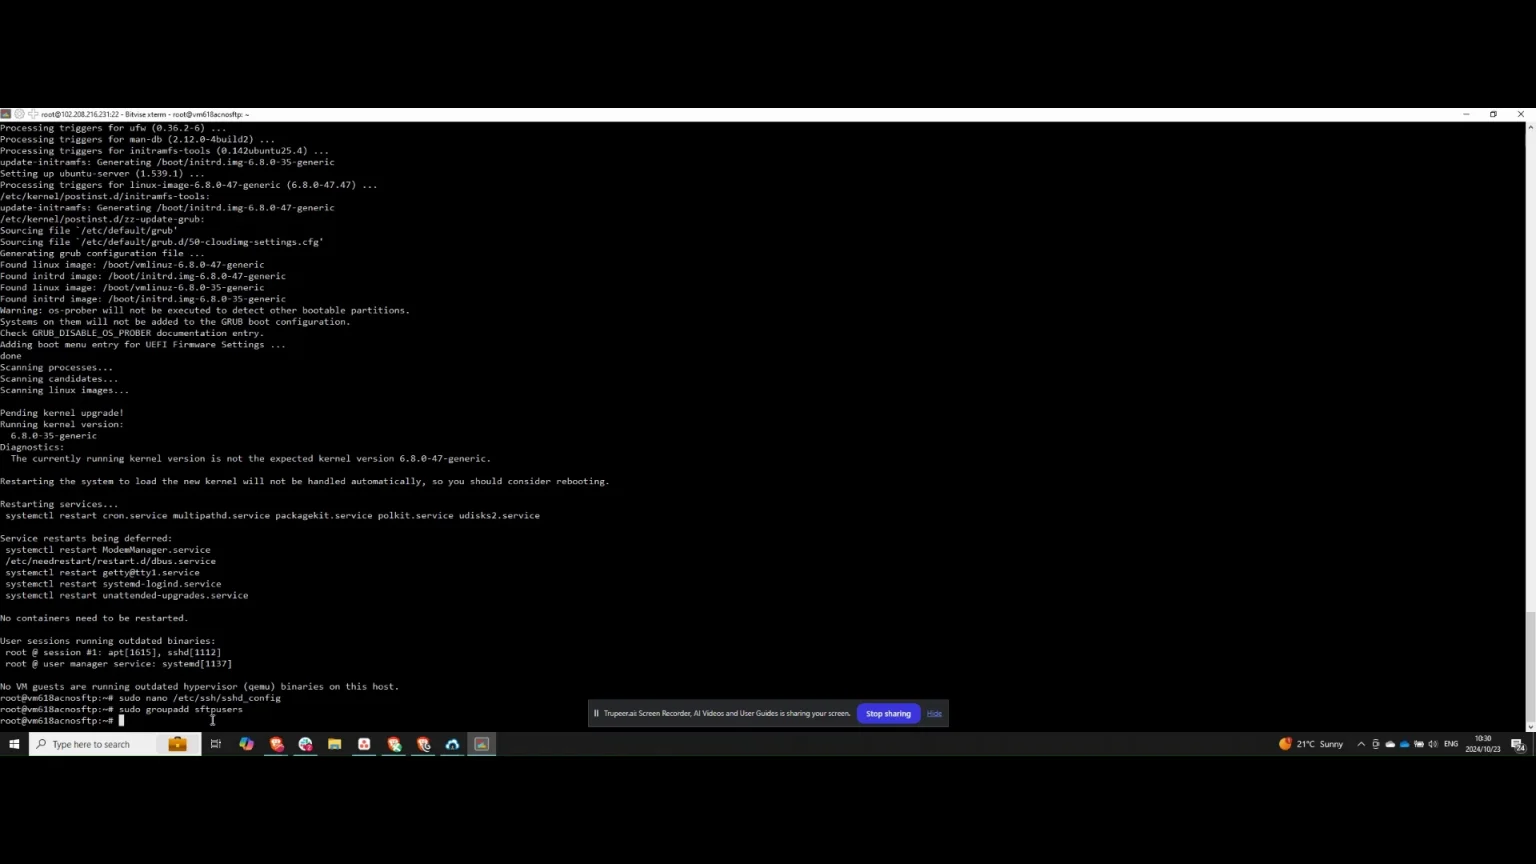
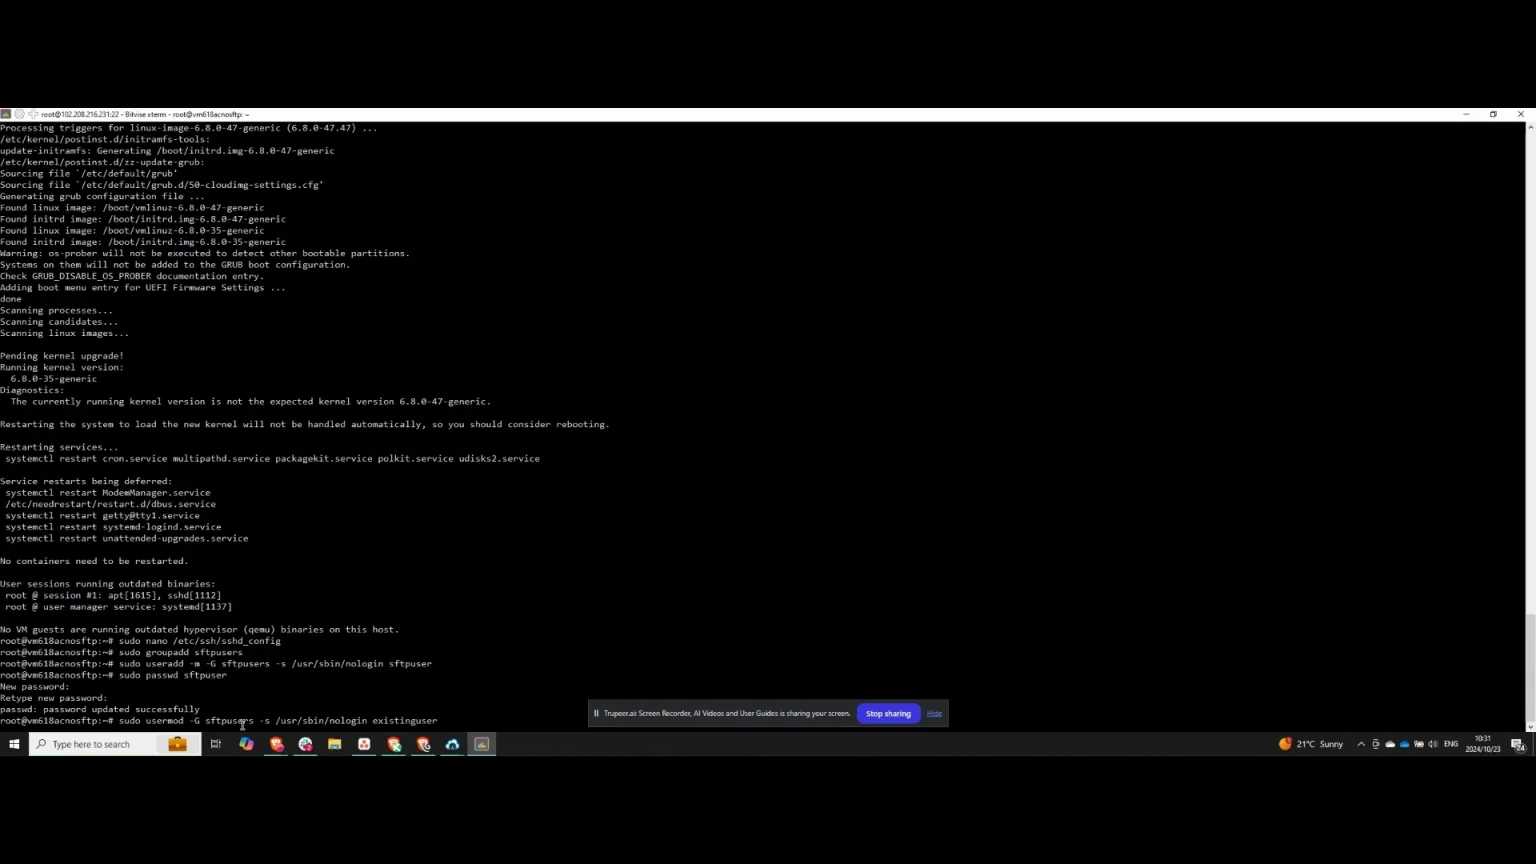
Step 4: Create SFTP User

You’ll need to create a new user and add them to the appropriate SFTP group. To do this, execute the necessary command to add the user. After adding the user, set a password for the SFTP user. The newly created user will be part of the SFTP users group.

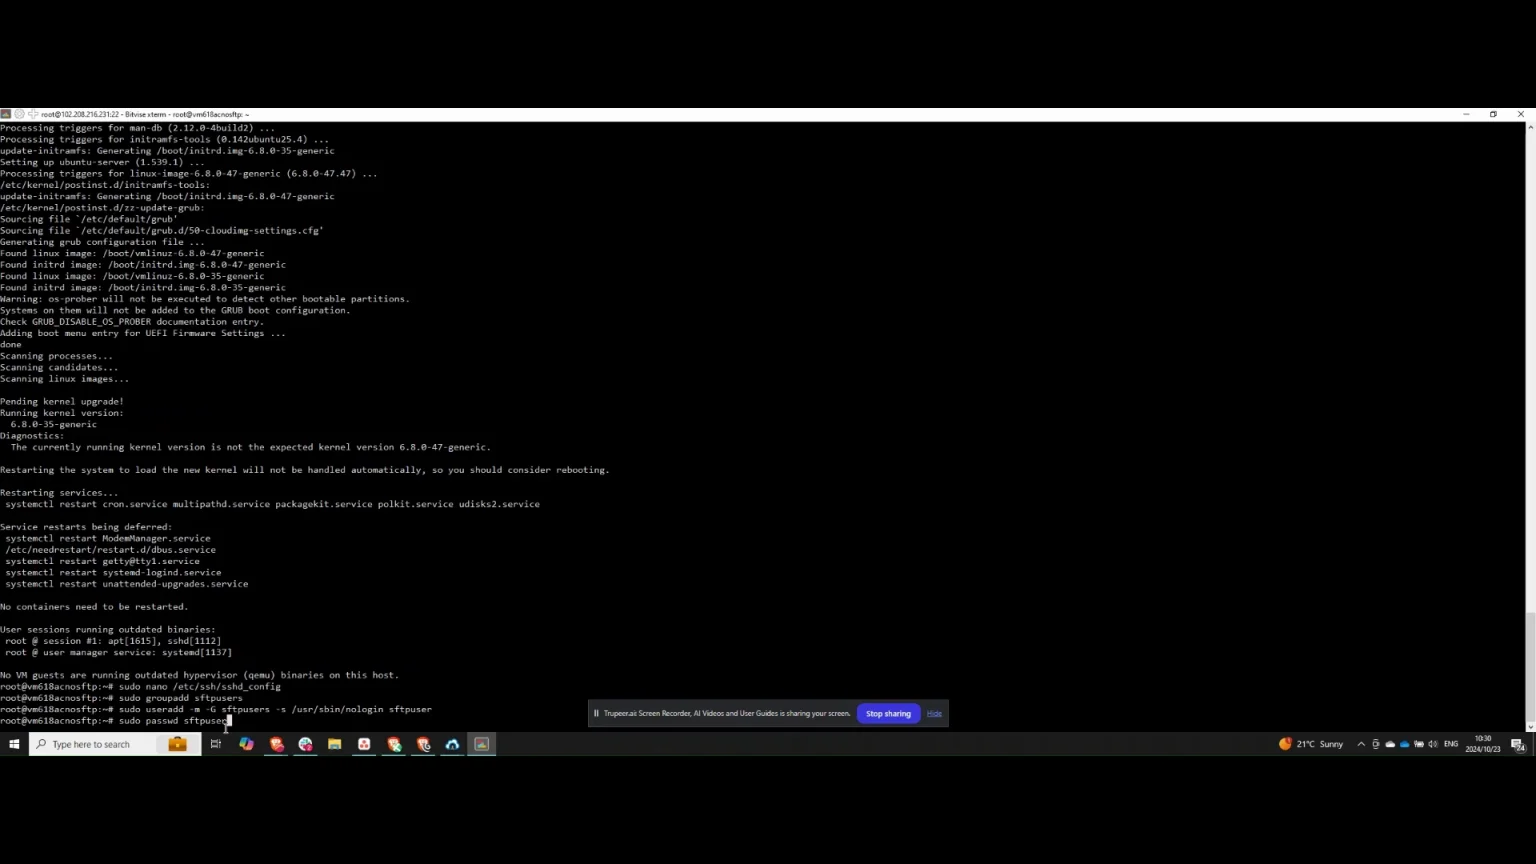
Step 5: Set User Password and Directory

Next, set the password for the user you added to the SFTP users group. After setting the password, create the SFTP directory. If you need to add an existing user to the SFTP user group, execute the respective command.

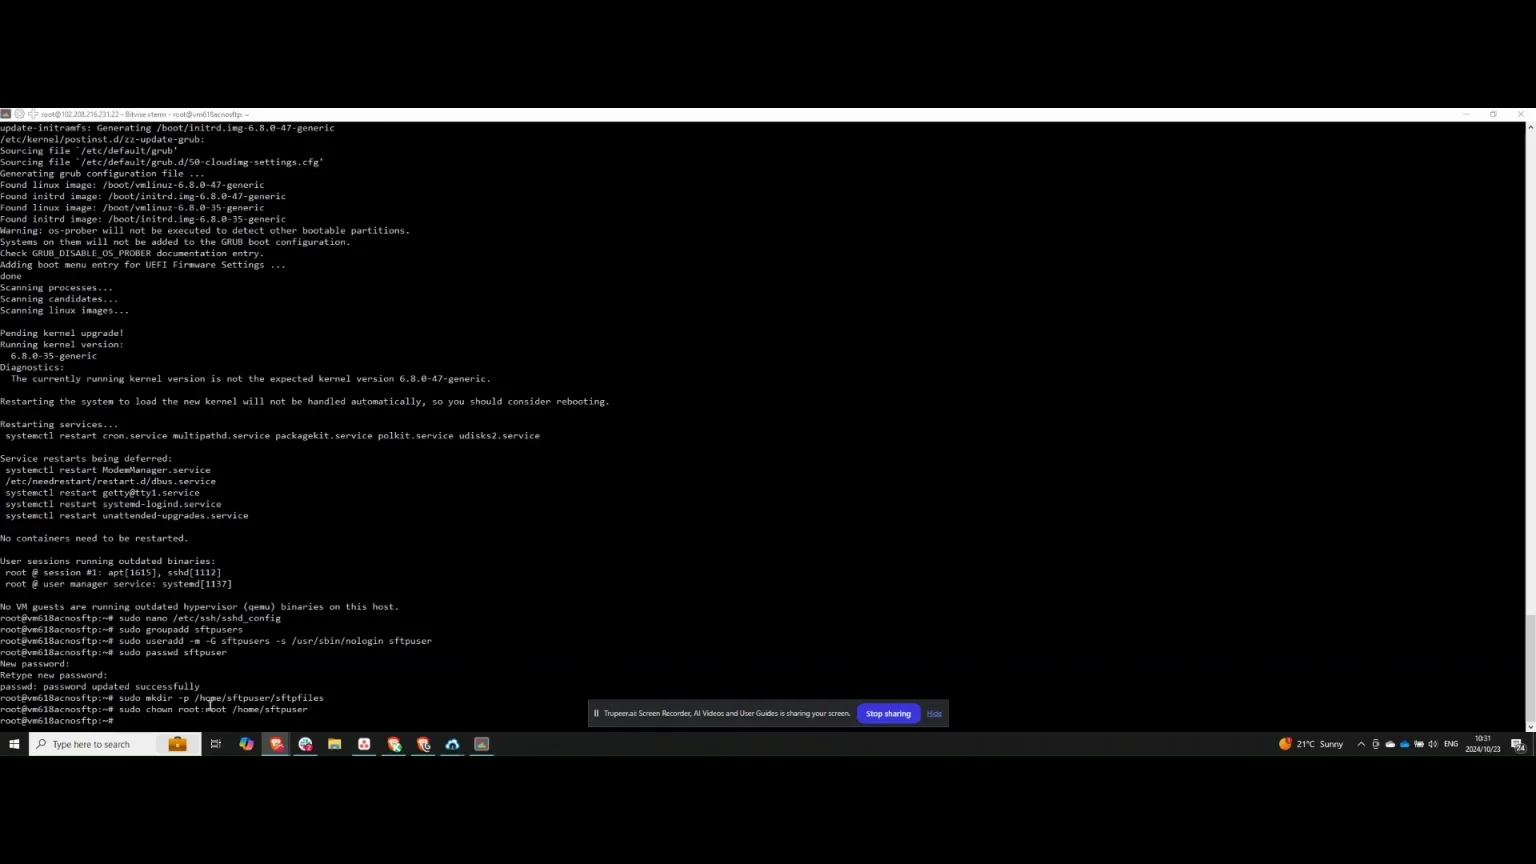
Step 6: Create SFTP Files Directory

Begin by creating a directory named “sftp_files” within the home directory of the SFTP user. Assign administrative permissions to the root user for this folder, which will allow further configuration of read permissions.

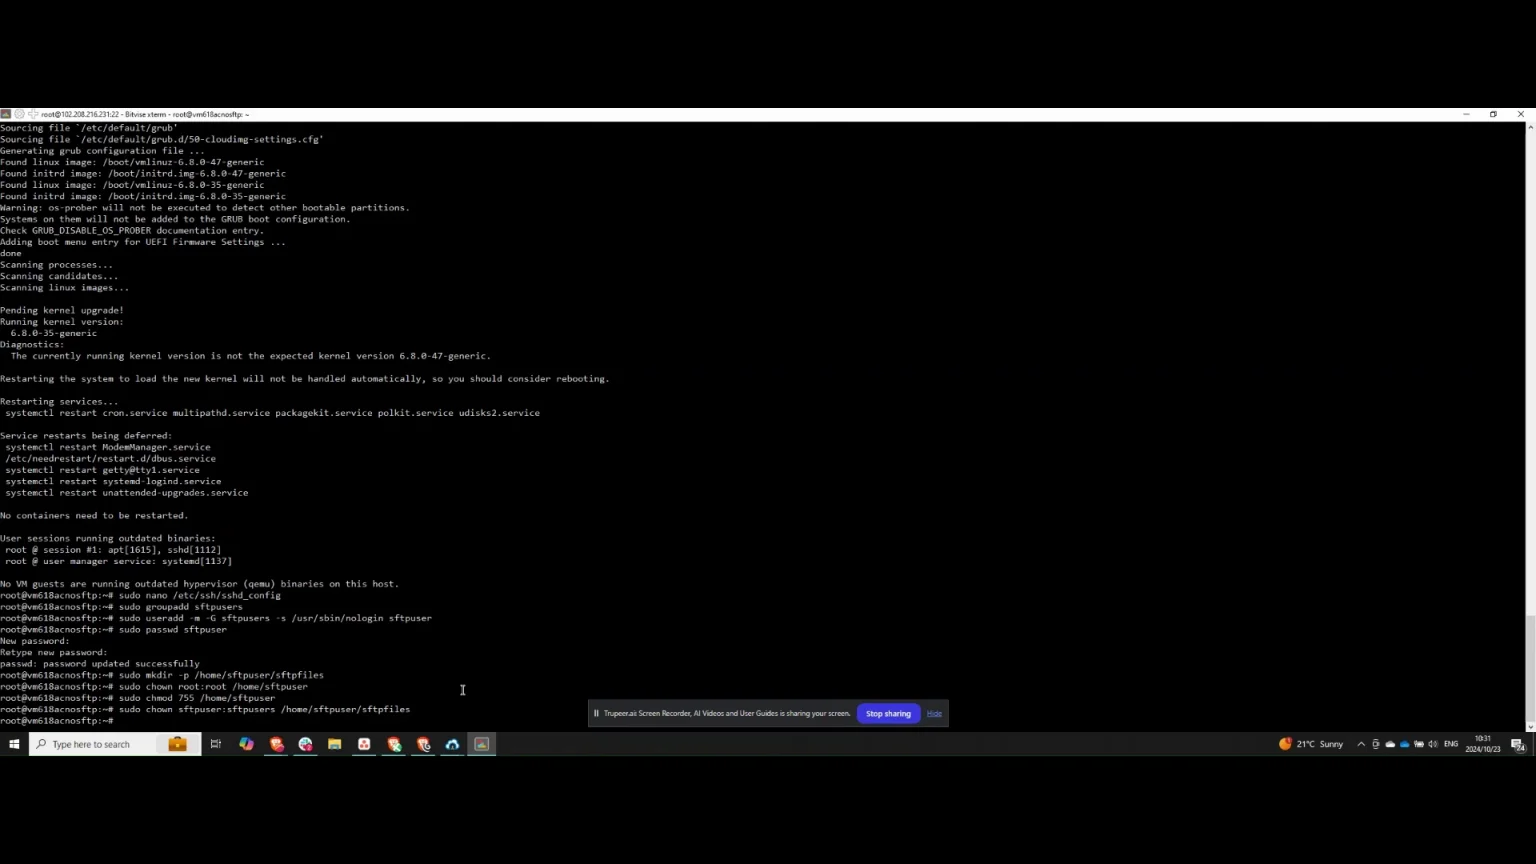
Step 7: Grant Folder Permissions

Grant read and write permissions to the folder. Then, provide the SFTP user with access to the folder using the necessary command. Afterward, update the SSHD configuration file to define the scope of the SFTP user’s access.

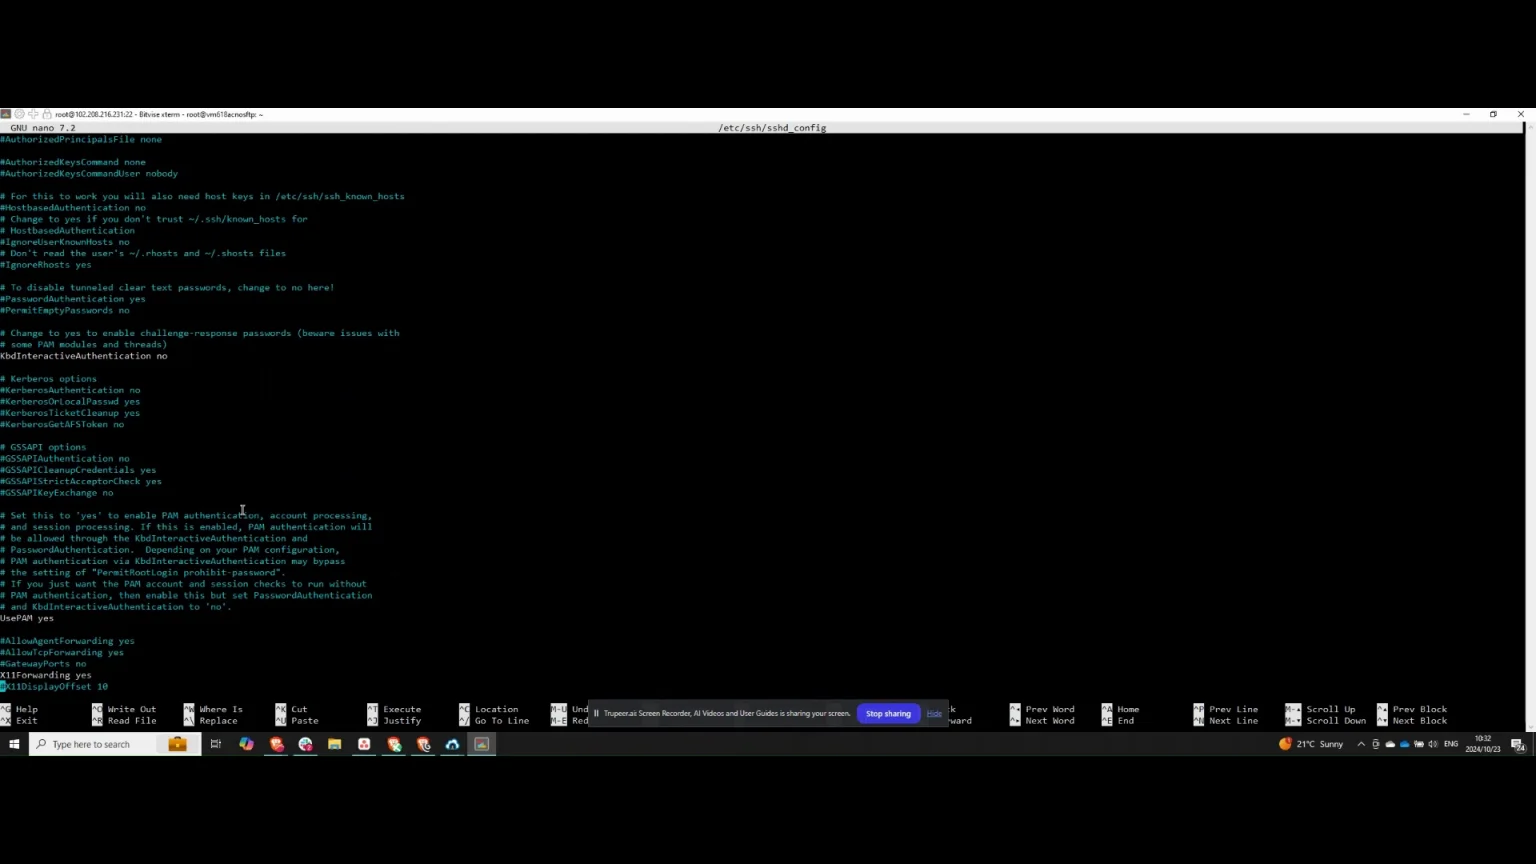
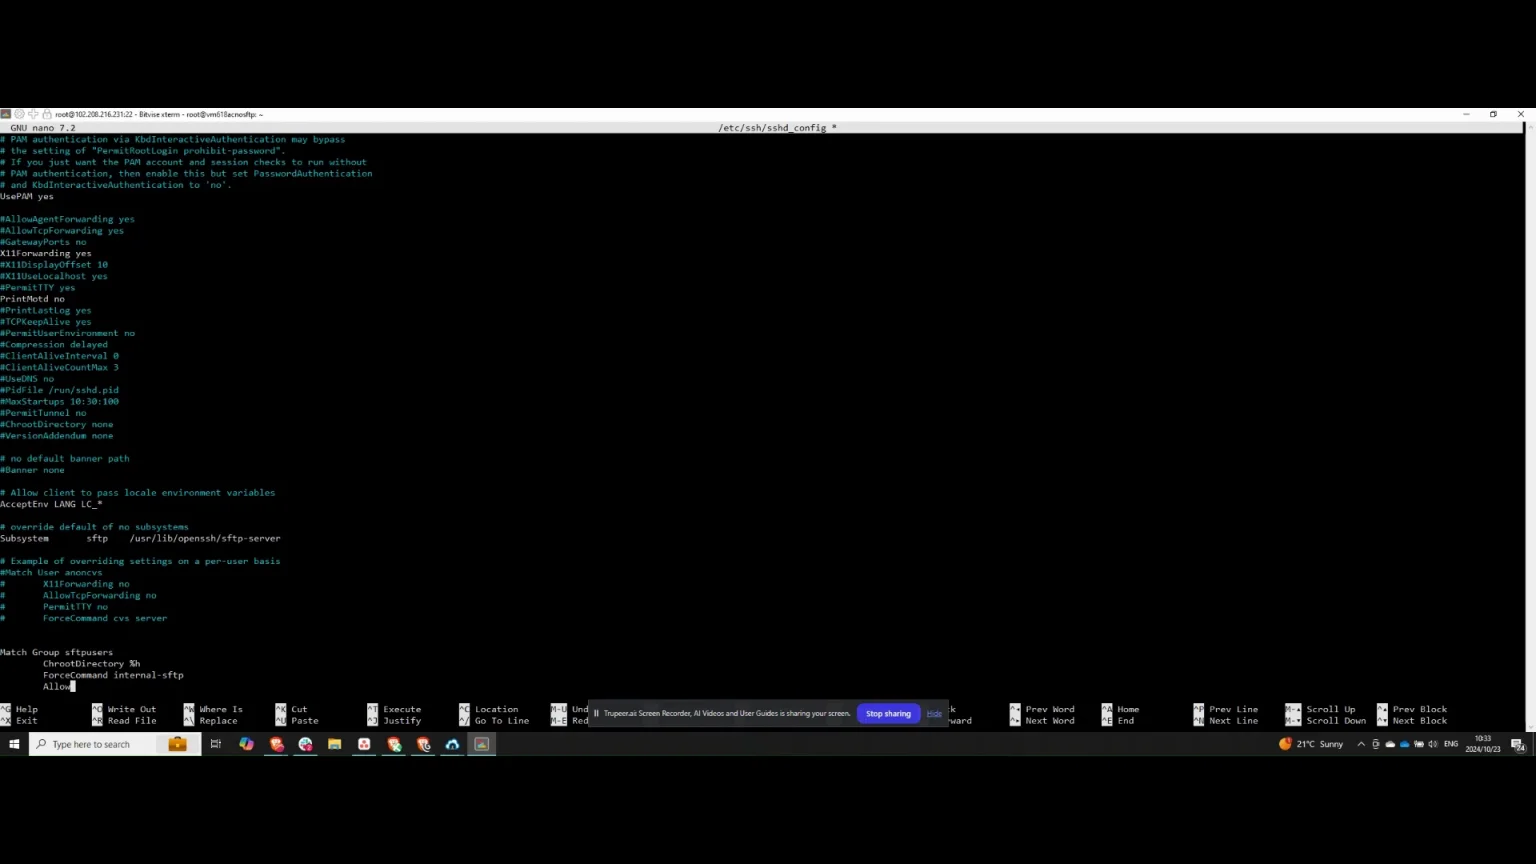
Step 8: Restrict User Access

Edit the SSHD configuration file to ensure the SFTP user can only access the SFTP files and cannot SSH into the server itself. Modify the file using a text editor such as sudo nano, navigating to the relevant section.

Step 9: Add SFTP User Override

Towards the bottom of the configuration file, add an override for SFTP users. Specify the SFTP user group, enforce the use of the internal SFTP command, and disallow TCP connections by setting TCPForwarding to no.

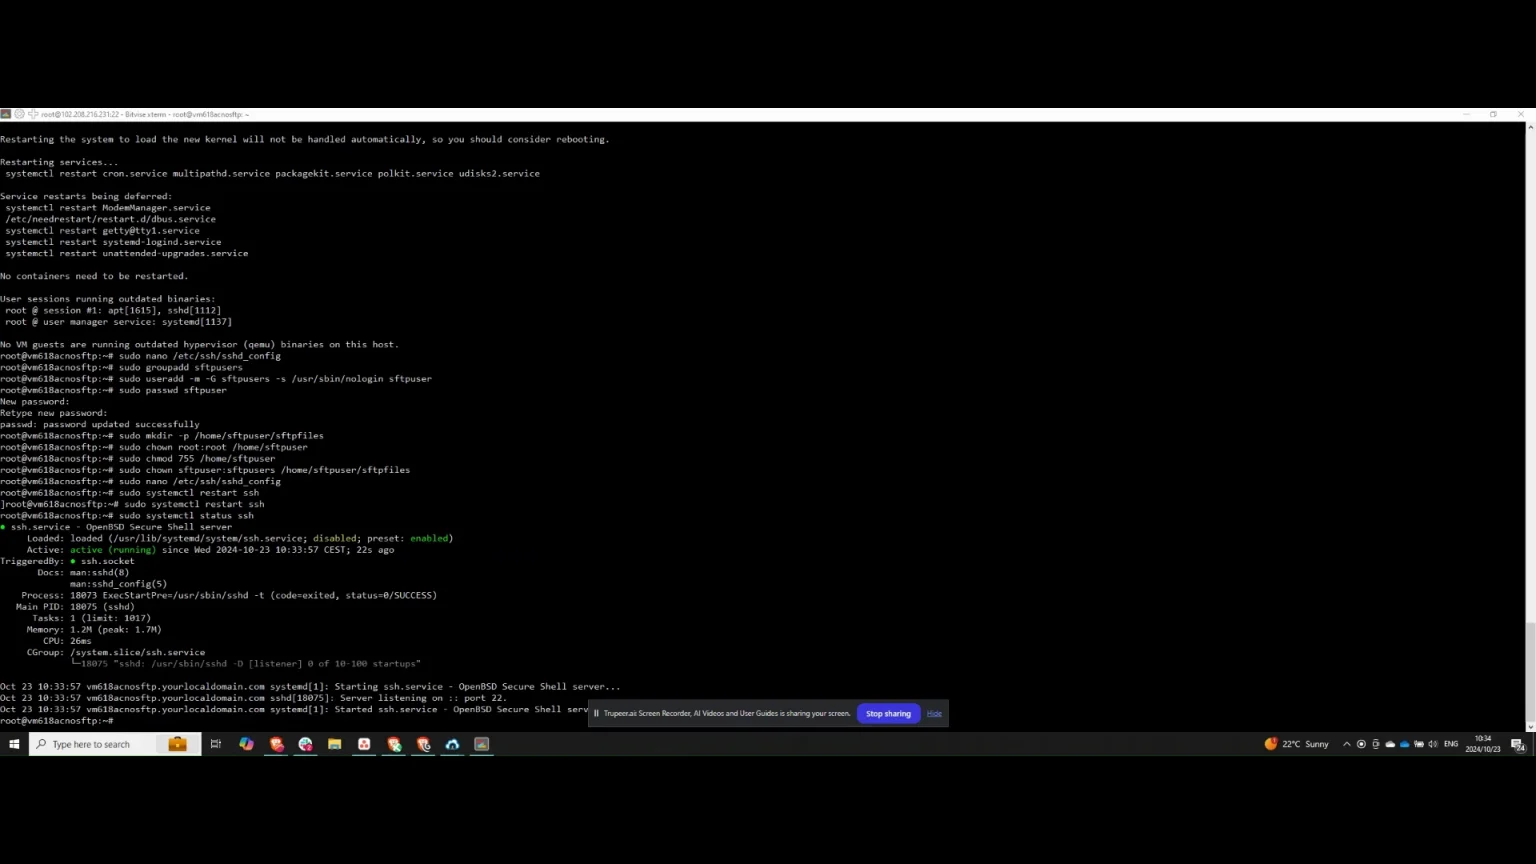
Step 10: Finalise Configuration

Ensure that TCP forwarding is disabled and X11 forwarding is prevented. Verify that all entries are correct. Once confirmed, save the changes and restart the SSH service to apply the new configuration.

Step 11: Restart SSH Service

Restart the SSH service by executing sudo systemctl restart ssh. Verify that the service is running correctly. Once confirmed, proceed to the next step.

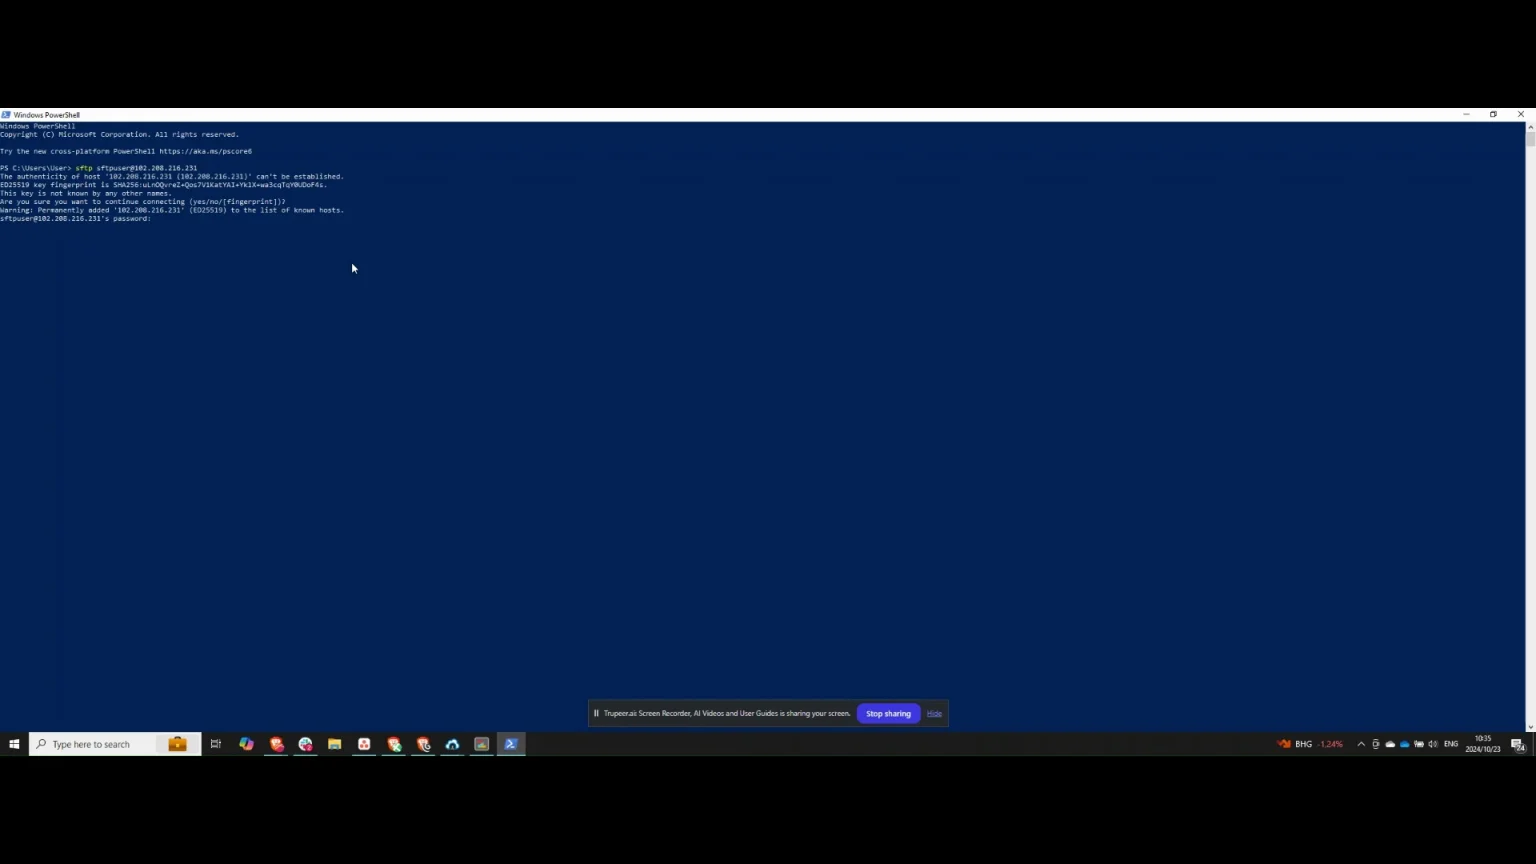
Step 12: Test SFTP Connection

Open Windows PowerShell and test the SFTP connection. Connect using the SFTP user account and the server’s IP address. When prompted, approve the creation of a fingerprint by typing “yes” and then enter the password for the user.

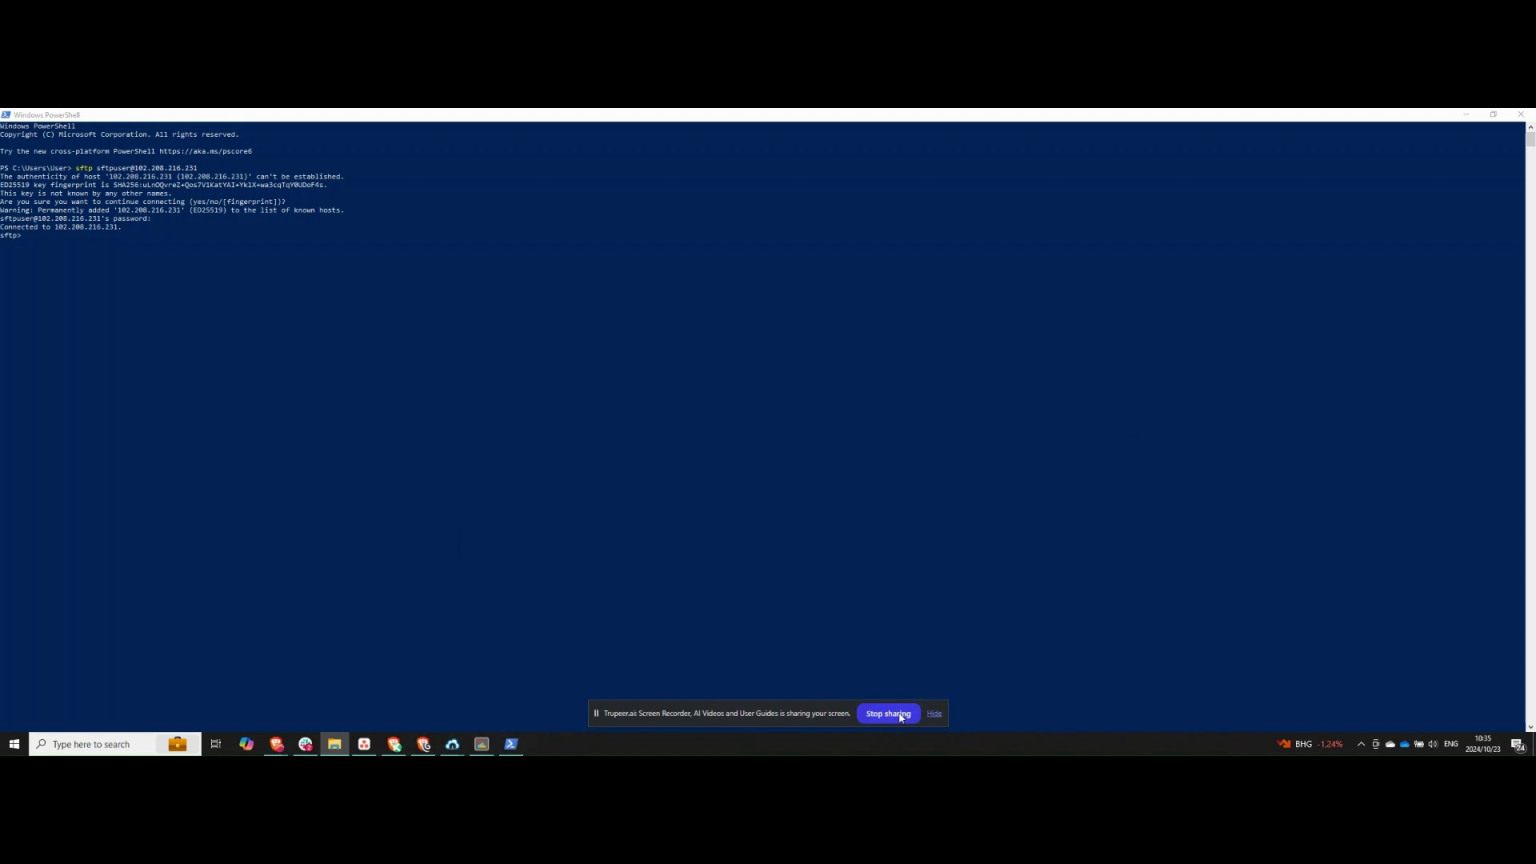
Step 13: Successful Connection

After successfully entering the password, your SFTP connection will be established.

NOTES

When connecting to the SFTP server if there are issues with obtaining a signature for the session.On Windows, C:\Users\User\.ssh\known_hosts must be edited (on Mac, it would be ~/.ssh/known_hosts) and the associated IP address signature must be removed so that a new one can be created automatically when connecting via SFTP.

Frequently Asked Questions

Why should I use SFTP instead of FTP?

SFTP encrypts the connection, protecting sensitive data from eavesdropping and other security threats, making it a more secure choice for file transfers compared to FTP.

Is it necessary to install the OpenSSH server for SFTP?

Yes, the OpenSSH server includes built-in support for SFTP. Installing and configuring it is essential for enabling SFTP functionality on your server.

Can I use an existing user for SFTP access?

Yes, you can add an existing user to the SFTP user group. Ensure that their permissions and directory access are configured correctly to enable SFTP functionality.

How can I test the SFTP connection after setup?

You can test the SFTP connection using a command-line interface like Windows PowerShell or Linux terminal by executing the command sftp username@server_ip and entering the password when prompted.

Why VPS Hosting from PakiWebHost is Your Best Bet

For SMBs and startups, VPS hosting emerges as the standout choice. It combines the scalability and performance needed to tackle traffic spikes with a cost structure that won’t strain your finances. Unlike shared hosting, VPS ensures your resources aren’t compromised by other sites. Compared to dedicated hosting, it offers similar control and reliability without the high price tag. And unlike cloud hosting with hyperscalers, it avoids unpredictable bills and excessive complexity.

With VPS hosting from PakiWebHost, you get a solution tailored to handle the unexpected. You can scale resources up during a traffic surge—ensuring your site stays fast and responsive—and scale back down when the rush subsides, all while keeping costs manageable. It’s the sweet spot for businesses that need robust hosting without overcommitting their budget.

Beyond affordability and scalability, VPS hosting offers customization. You can fine-tune server settings, install specific software, and optimize performance to suit your unique needs. This level of control empowers you to prepare for spikes proactively, ensuring your website remains a reliable asset no matter the circumstances.

Strategies for Managing Traffic Spikes with VPS Hosting

To maximize the benefits of VPS hosting from PakiWebHost, implement these actionable strategies to keep your website running smoothly during traffic surges:

1. Proactive Monitoring

Stay ahead of issues by using tools like Nagios, Zabbix, or PakiWebHost’s built-in monitoring features. Track server health, traffic patterns, and resource usage in real time. Set up alerts for unusual spikes or performance dips, allowing you to respond before visitors notice a problem.

2. Load Balancing

Distribute incoming traffic across multiple VPS instances or servers with load balancers like HAProxy or Nginx. This prevents any single server from becoming overwhelmed, maintaining speed and uptime even under heavy load.

3. Caching and Content Delivery Networks (CDNs)

Reduce server strain with caching tools such as Varnish, Litespeed, or Redis. Pair these with a CDN like Cloudflare or Akamai to deliver cached content from edge locations worldwide, speeding up load times and easing the burden on your VPS during surges.

4. Optimizing Your Server Setup

Regularly audit and adjust your server configuration. Optimize database queries, allocate resources efficiently, and fine-tune application settings to enhance performance. PakiWebHost’s support team can assist in ensuring your VPS is primed for peak traffic.

By combining these strategies with PakiWebHost’s VPS hosting, you’ll transform traffic spikes from a threat into an opportunity. Your website will remain fast, reliable, and ready to impress visitors—no matter how many show up.


Conclusion: Secure Your Success with PakiWebHost

Traffic spikes don’t have to spell disaster. With the right hosting solution, they can become a chance to shine. VPS hosting from PakiWebHost offers the perfect blend of scalability, performance, and affordability, making it the ideal choice for SMBs and startups preparing for the unpredictable. By leveraging proactive monitoring, load balancing, caching, and server optimization, you can ensure your website thrives under pressure.

Don’t let an unexpected rush catch you off guard. Equip your business with a hosting solution that grows with you, keeping your site online and your customers happy. Your digital storefront deserves the best—because your success depends on it.

Ready to safeguard your website against traffic spikes? Explore PakiWebHost’s scalable, affordable VPS hosting plans today and take control of your online future. Don’t leave your performance to chance—choose PakiWebHost and stay ahead of the curve!

Avoid Hidden Cloud Host Costs

How to Avoid Surprises and Choose the Right Solution Cloud hosting is often marketed as an affordable, flexible solution with its pay-as-you-go model and scalable resources....Read More

VPS for Crypto Operations?

A Comprehensive Guide to Using a VPS for Crypto Operations A Virtual Private Server (VPS) is a dynamic solution for individuals and businesses engaged in cryptocurrency...Read More

Shared Hosting vs VPS

Shared Hosting vs. VPS Hosting: Which Is Right for Your Website? Choosing the right hosting solution is critical for your website’s performance, security, and scalability. Two...Read More

Understanding Cloud Hosting

A Comprehensive Guide for Modern Businesses In today’s rapidly evolving digital economy, businesses demand robust, scalable, & cost-efficient solutions to maintain a competitive edge. Cloud hosting...Read More

VPS vs VDS vs Dedicated Servers

Hosting Solutions: VPS, VDS, and Dedicated Servers Explained Choosing the right hosting solution is critical for businesses and individuals looking to establish a reliable online presence....Read More

Running Screaming Frog in the Cloud

Running Screaming Frog in the Cloud using a PakiWebHost Server Running SEO audits at scale can be resource-intensive, especially when dealing with large websites. Local machines...Read More

Need help choosing a plan?

Need help? We're always here for you.